Azure Event Grid Filters

In this post I’m taking a deeper look at Azure Event Grid filters and using them in Azure Logic Apps. Take note that Azure Event Grid was in preview at the time of writing and there were a few hiccups.

Event Data Schema

I used this quickstart from the Azure team as a base. It used this JSON file for the event data.

[
 {
 "id": "'"$RANDOM"'",
 "eventType": "recordInserted",
 "subject": "myapp/vehicles/motorcycles",
 "eventTime": "'`date +%Y-%m-%dT%H:%M:%S%z`'",
 "data":{
 "make": "Ducati",
 "model": "Monster"
 }
 }
]

You can read the full schema documentation here. The id, eventType, subject and eventTime properties are required and most of them are used internally by Azure Event Grid. The data object is for your custom data and can be any JSON object.

Filters

An event subscription can contain prefix, suffix and event type filters.


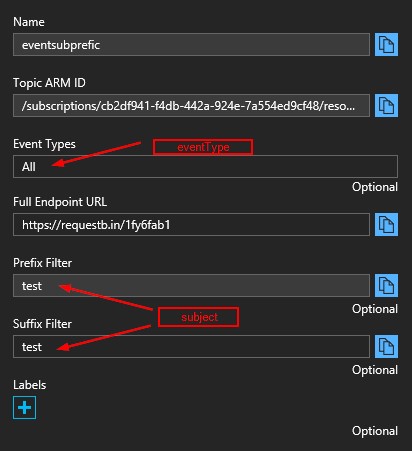
The event type filter will filter on the eventType property. You can add multiple event types separated by a semi colon, wild cards do not work.The prefix and suffix filters will filter on the subject property. You cannot add multiple values in a prefix or suffix filter and wild cards do not work.
Side Note: The Prefix filter was read only in the Azure portal when I tested it but you could set it using the Azure CLI.

az eventgrid topic event-subscription create --name eventsubprefic --endpoint https://requestb.in/1fy6fab1 -g gridResourceGroup --topic-name testtopic5765 --subject-begins-with test

You can read the full event subscription schema here.

Using Azure Event Grid In A Logic App

I used the quick start example here as a base and used the SendGrid connector to notify me of events in a resource group. At the time of writing Azure Event Grid was still in preview so there will be some problems which are pointed out in the documentation. You have to login with an Azure Directory user or use a Service Principal connection for the Azure Event Grid connector in the Logic App designer. If you use a Microsoft live account it won’t be able to connect to Azure.

I also had a problem accessing all the event properties in the dynamic content window, the body wasn’t showing for instance. To work around it, switch to the expression editor and start typing the property names to see the full list. Now you can switch back to the dynamic content window and select the properties you want in the email body.


You can apply prefix and suffix filters by clicking on Show advanced options but not on the eventType.


If you have a requirement to filter on other properties you can do it by adding a condition statement and writing some code. The quick start I mentioned earlier shows exactly how to do this.

Francois Delport

Azure Event Grid Explained

In this post I’m going to have a look at Azure Event Grid which recently entered public preview. This is a summary I put together to wrap my head around it after reading the official documentation.

First Some Terminology

  • Event Publisher – The application/service/component raising the event.
  • Event Handler –  The end consumer of the event.
  • PubSub pattern – Azure Event Hub implements the Publish-Subscribe message pattern, link here. The main benefit of this pattern is loose coupling between publishers of events and the clients consuming them. In other words the publisher of an event doesn’t have to know about each consumer of the event.
  • Topic – The endpoint for event publishers to send their events to and also the endpoint for event subscribers to subscribe to events. Also provides security, message filtering and reliable delivery.
  • Event Subscription – The mechanism used to distribute events to registered event handlers.

What does it do

Azure Event Grid is a managed event routing service. It uses a publish-subscribe model to register client web endpoints with a publisher to receive events. It is aimed at but not limited to serverless applications with built in support in Azure Functions and Azure Logic Applications. That said it supports custom events as well and any web URL can be registered as a webhook to receive events. It is built on Service Fabric to provide scalability and resilience transparently to the end user.

How does it work

Event publishers and event handlers to subscribe to a Topic. The Topic will provide the endpoint for event publishers to sent their events to and event handlers to register to receive events. The mechanism that connects event handlers to the specific events they want to handle is the Event Subscription. The Event Subscription contains the URL to the event handler which it will invoke when a matching event occurs. Event Subscriptions can filter events by type, prefix filter or suffix filter. You can add multiple strings in the filter fields by separating them with a semi colon.

Azure Event Grid

If you look at this sample event used in the quick start, you will see the eventType field used for the type filter.

Azure Event Grid


Azure Event Support

At the time of writing Azure Event Grid already exposed some Azure events like Resource Group and Subscription CRUD events. You will find them in the Event Subscriptions blade in the Azure Portal.

Azure Event Grid

Azure Logic Apps also comes with a connector for Azure Event Grid.

Azure Event Grid

Francois Delport

Create Custom Virtual Machine Image In New Azure Portal

In this post I’ll show you how to create custom virtual machine images in the new Azure Portal for ARM Virtual Machines and Dev Test Labs. Creating custom virtual machine images from your existing virtual machines is a bit different in the new Azure portal compared to the old one. There are lots of resources showing how to do it in PowerShell, Azure CLI and ASM VMs but not so much ARM VMs in the new Azure Portal. For some reason it is not so intuitive that I could just stumbled upon it by exploring the portal.

Create Custom Virtual Machine Image In The Portal

My first thought was to look for a capture image button on the VM blade but there isn’t one, it is now a separate resource on its own blade.

ImagesMenu

If you plan on creating multiple distinct VMs from this image you have to run sysprep before creating the image. If you really want to make clones of this instance you can skip sysprep. The images are created as Managed Disks and you can’t change it so keep the associated cost in mind.

Create Virtual Machine From Custom Image In The Portal

To create a VM from the custom image created earlier you have to go back to the Image blade.

CreateVMFromImage

Create Custom Virtual Machine Image In Dev Test Labs
Firstly Dev Test Labs are pretty awesome, have a look at it if you have to manage multiple VMs for development, testing or training labs. Creating custom images in Dev Test Labs are a bit easier, the “Create custom image” menu item is right on the VM blade.

CreateImageDevTest

You also have the option to run sysprep if you didn’t already or to skip it. Note that the VM will become unusable if you run sysprep.

RunSysPrep

To manage the existing custom images you have to open the “Configuration and policies” blade and you’ll see the “Custom Images” menu item.

ManageCustomImages

Create Virtual Machine From Custom Image In Dev Test Labs

To create a VM from your custom image is very intuitive in Dev Test Labs, when you click on the Add button to create a VM your custom images will be right there with the existing VM templates.

CreateFromCustomImageDevTest

The same applies when you create new Formulas, which is basically creating the new templates in Dev Test Labs.

Francois Delport

Azure Enterprise Agreement Billing API And Billing Updates

In this post I’m going to have a look at the Azure Enterprise Agreement Billing API and billing updates. The updates enable emailing invoices and some PowerShell cmdlets to retrieve invoices.

Emailing Invoices

You can opt in to receive your monthly invoice via email, which beats logging into the portal to download them every time. You’ll find the options to configure recipients on the Invoices menu in the Subscriptions blade.

InvoicesBlade

This feature is only available to consumer Azure subscriptions.

PowerShell Invoice Cmdlet

The Get-​Azure​Rm​Billing​Invoice cmdlet that provides the ability to download invoices is currently in preview. Before you can successfully use the cmdlet you have to enable access to your invoices in the Subscription blade of the Azure Portal.

InvoiceCmdLets

By default users with Subscription administration access will be able to retrieve invoices. You can grant other users access by assigning the Billing Reader role to users from the Access Control menu on the Subscription blade.

BillingRBAC

Calling the Get-​Azure​Rm​Billing​Invoice cmdlet doesn’t return the actual invoice but rather an Invoice object that contains amongst others a DownloadURL property that you can use to download the invoice. Note the URL is valid for 1 hour.

Login-AzureRmAccount
 $inv = Get-AzureRmBillingInvoice -Latest
 Invoke-WebRequest -Uri $inv.DownloadUrl -OutFile C:\Temp\Invoice.pdf

This feature is only available to consumer Azure subscriptions.

Invoice Retrieval For Enterprise Agreement Customers

If your are an EA customer the above method won’t work for you but you can download your usage and charges using the Billing Rest API for EA customers. In some respects this is easier for EA customers since the dataset returned contains usage and charges, you don’t have to calculate it separately. Before using the API you have to get your API key from the EA portal.

EA

You can find out more about using the API in this channel 9 video which also contains this link in the show notes that describes the API.

PowerBI Integration With The EA Portal

You can also export your billing data to PowerBI from the EA portal using the Power BI Reporting tab on the Reports menu. This functionality is provided by the Power BI Enterprise Pack, although it is a manual process to export data the first time, you can schedule the dataset to refresh automatically, more here and you can subscribe to report emails, it is in preview so the functionality is still evolving, more here.

Retrieve Usage Using PowerShell Cmdlets

The Get-UsageAggregates cmdlet is not a new feature but I didn’t get a chance to cover it yet. You can use it to retrieve resource usage, take note that the cmdlet makes use of a continuation token since the dataset can be quite large if you download detailed usage. Your billing charges can be calculated by retrieving the rates separately using the RateCard API and matching it to your usage, I covered the RateCard API in a previous post. The Get-UsageAggregates cmdlet is available to consumer Azure subscriptions and Enterprise Agreement subscriptions but the RateCard API is for consumer Azure subscriptions only.

Francois Delport

Azure Resource Policies

Azure Resource Policies has been around for a while but it was a bit under the radar since it didn’t have portal support and it is aimed at larger environments where more control is required. Azure Resource Policies enable you to define rules that resources must comply to when you create or update them. For instance you can specify a naming convention, restrict locations where resources can be created or restrict which type of resources users can create. It differs from RBAC in that RBAC controlled what users could do based on permissions, you could prevent a user from creating VMs or Storage Accounts while Azure Resource Policies define finer grained rules based on conditional logic, for example allowing or blocking a specific VM series or type of storage account. Azure Resource Policies recently became available in the preview portal.

Tip: If you didn’t know it already you can see some of the upcoming features currently in preview by using the Azure Preview Portal link.

Azure Resource Policy Structure
Azure Resource Policies are authored using JSON and basically contain parameters and rules, there is some extra descriptive stuff but you can read the comprehensive documentation here. Parameters make your policies re-usable as opposed to hard coding values. The policy rules are if..then code blocks than can use a range of logical operators and can be nested.

{
  "if": {
    <condition> | <logical operator>
  },
  "then": {
    "effect": "deny | audit | append"
  }
}

In the documentation referenced earlier you will see a list of fields and resource properties you can access to build your rules for example the location of a resource or the SKU of a VM. The JSON document containing the parameters, rules etc is called a Policy Definition.

Deploying A Resource Policy
After you create the JSON Policy Definition you have to deploy it to your subscription, the detailed deployment documentation can be found here. Short version, you can use the Azure Rest API, PowerShell or Azure CLI but sadly not the portal at this point in time. Policy definitions are stored at subscription level but are not active until you assign them to a resource group or subscription scope. Make sure to update Azure PowerShell or the policy samples from the documentation won’t work. There are some predefined policies in Azure as well, if you run the Get-AzureRmPolicyDefinition PowerShell command you will see them.

Assigning A Resource Policy
After the Policy Definition is deployed you can assign it to a resource group or subscription using the Azure Rest API, PowerShell, Azure CLI or preview portal. You will find the Policies menu item under your subscription.

Azure Resource Policies

From here you can assign policies to a resource group or subscription and provide parameters for the policy. You will also see the predefined policies in the drop down list.

Azure Resource Policies

Francois Delport

Automating Azure VM Backups Using ARM Templates

In this post I will give a quick overview of automating Azure VM backups using ARM templates. There are quick start templates for backups when you search for them but the syntax for the resource names didn’t make sense to me, hence this post to explain it a bit more. I will also touch on using Azure Resource Explorer which is a great tool for understanding the ARM API.

Azure VM Backups Background

To backup Azure VMs with Azure Backup you have to create a Recovery Services vault, create a backup policy which contains the schedule and backup retention settings and register your VMs for backups to the vault and selected policy. There are quick start templates to create vaults, policies and schedules here. Although you won’t see it from the portal there is also the notion of a container for storing backups. The type of container depends on the items that are backed up, there are containers for Azure VMs, SQL backups and Windows backups. This is the part that wasn’t clear to me in authoring ARM templates but next I’ll show you how to shed some light on them.

Azure VM Backup Resource Syntax

One way to figure out the syntax for an ARM template is to look at existing resources and export the template from the Azure Portal using the Automation script blade but that will export your vault only, not your VM backups.

Next I tried Azure Resource Explorer, drilling down to my recovery vault I didn’t see the VMs that are registered for backups or the policies but I did manage to find the deployments for them in:

{resourcegroup}\Microsoft.Resources\deployments

The deployments to create a backup policy are named CreatePolicy* and the deployments to register a VM for backups are named ConfigureProtection*. In the deployment for VM protection I managed to find the syntax for the resourceName.

Automating Azure VM Backups Using ARM Templates

The ARM template to register multiple VMs for backups is in my GitHub repo here. The template assumes the VMs are not in the same resource group as the recovery vault since the backup vault was contained in a separate management resource group in this case.

A Bit More On Azure Resource Explorer

I highly recommend taking a few minutes to take a look at the Azure Resource Explorer. It is a great way to explore the syntax for Azure ARM Rest API, there are tabs to execute some Rest API commands directly from the explorer, PowerShell samples to create the currently selected resource and documentation for the selected resource.

Francois Delport

Azure Managed Disks

Azure Managed Disks became generally available recently and I decided to take the feature for a spin.

With Azure Managed Disks you don’t need a storage account anymore so you won’t be hitting I/O or size limits at the storage account level but the default limit is 2000 Managed Disks per subscription which can be increased if you contact support.

When you create a VM you can now choose to use Managed Disks or Unmanaged Disks, the default is Unmanaged Disks. The Managed Disks show up as resources directly in your resource group, no more drilling down in storage accounts to see what is happening.

Azure Managed Disks

When you add additional Managed Disks you can choose to create the VHDs from a snapshot, custom image blob or create one from scratch.

To create a snapshot in the Azure Portal you have to click on New and search for Snapshot. I found this a bit weird, my instinct was to browse to the disk in a resource group or a under a VM and look for a snapshot button there on the disk blade next to Export and Delete but anyway.

Azure Managed Disks

You can export a disk to blob storage by using the Export button on the disk blade.

Another great feature of Managed Disks is the ability to change the size and type of a disk but you have to stop the VM first or else you get this error.

Azure Managed Disks

Keep in mind you can’t change to a smaller disk size and if you want to use Premium Managed Disks you have to choose a VM family that supports Premium Storage like DS.

The price of Premium Managed Disks is the same as Premium Unmanaged Disks but the price of Standard Managed Disks is different from Standard Unmanaged Disks. For Standard Managed Disks you pay based on the size of the disk provisioned, not the data that is used on the disk. At the time of writing Standard Managed Disks were on a promotional price.

Azure Managed Disks

I did a quick comparison on the normal price and provided you use all the space on a disk a full Standard Managed Disk is 20% cheaper than a full Standard Unmanaged Disk. Since is not really practical to have a full disk you’ll have to way up the pros and cons for your scenario. Keep in mind you can start with a smaller disk and resize it later. You can also migrate Unmanaged Disks to Managed Disks but it looks like the only way to do it at the moment is PowerShell.

Francois Delport

Azure Tooling For Orchestration And Hybrid Environments

In this post I’m going to have a quick look at Azure tooling for orchestration and hybrid environments. The Azure Portal and its automation options works great for developers and operations staff to manage resources but sometimes you need more. The two scenarios I come across very often are hybrid cloud and service catalogs with an accompanying self service portal.

With hybrid cloud you have to consider the integration with on-premise resources and APIs or even other cloud providers. On the service catalog side you have to consider the services you will provide, the orchestration for provisioning,  integration with a service management tool and implementing business rules for approval and access.

At the moment the Microsoft tooling landscape is a bit of a minefield with the transition from ASM to ARM for Azure and the changes in System Center to cater for hybrid cloud environments. In this post I’ll be looking at tooling around System Center 2012 R2 and Azure Pack. May be later on I will take a look at System Center 2016 and Azure Stack.

Azure Pack Private Cloud
It supports an ASM style API that is different from the public Azure ASM API. The recommended automation solution for Azure Pack is Service Management Automation. It is stand alone component you install from the System Center Orchestrator installation media. It executes PowerShell workflows based on events or a schedule. It is aimed at administrating the fabric of your cloud and is not suited for tenants launching workflows to provision resources.

If you don’t need complicated workflows you can create Virtual Machine Roles, they enables users to select different options during deployment, install extensions and deploy multiple VMs together that form a logical grouping.

Azure Pack In A Hybrid Environment
In a hybrid environment you can use the Windows Azure Pack Connector to provision VMs on premise and in public Azure using the Azure Pack portal and API. There are also 3rd party solutions that provide similar functionality for other resource types. You will be writing ASM style PowerShell scripts that can execute against public Azure ARM via the connector or on premise Azure Pack VMs using the same Azure Pack API.

System Center Orchestrator
If you want to have even more control over the provisioning process or have integration requirements with non Microsoft hybrid environments you can use System Center Orchestrator to create complex workflows. There a few options when it comes to Orchestrator, this article describes it in more detail. Orchestrator offers a graphical authoring experience for on  premise resources using integration packs. You can connect it to public Azure using the Azure Integration Pack for Orchestrator but this is only for ASM not ARM. You can also use it to execute PowerShell to cater for any tasks not provided by integration packs like calling Azure ARM PowerShell, deploying ARM templates or executing automation runbooks.

Self Service Portal
To create your own front end or self service portal for users you can use System Center Service Manager Portal, it integrates with Orchestrator to run workflows. You can modify the front end to present users with prompts and you can control access and require change approval for actions.

Azure Automation
Azure Automation give you the ability to run PowerShell workflows and scripts in the public cloud, the scripts are stored in Azure along with other assets like connection strings, certificates etc. By default it can’t access on premise resources that are not publicly accessible. You have the option to install hybrid runbook workers on premise to receive jobs from Azure Automation, these will obviously have access to any local resources visible to them.

App Controller
This is not really automation but it can gives you more control over the users ability to access resources in the cloud and on premise. It also hides details from users, for instance they don’t have to know the Azure subscription details or even have a subscription to provision Azure resources. You define connections in App Controller and grant users access to it. It can connect to various resources like Hyper-V, Azure and vCenter.

Application Roadmap
Keep in mind all the information in this blog relates to Azure Pack and System Center 2012, a lot changed in System Center 2016 and Azure Stack. Before you invest in any of the tools take a look at the road map for the products for example App Controller has been deprecated in System Center 2016 and Orchestrator seems to be dead in water, no new features were added in System Center 2016.

Francois Delport

How To Assign A Public Static IP Address In Azure Using Azure Resource Manager

In this post I’m going to show you how to assign a public static IP address in Azure using Azure Resource Manager, if you are using the classic deployment model use this link.

Contrasting Classic Deployment With ARM
In ARM you don’t have a cloud service that is the container for your VM, load balancer, public IP and other functionality any more. The different components that make up your environment is clearly separated and you compose your environment by stitching together the pieces you need. For example, you can create a network interface card on it’s own, it doesn’t have to be part of a VM and you can move it between VMs or attach it to a load balancer etc. Same goes for your public IP addresses, load balancers, network groups etc. That said you can create everything you need for your environment in the same ARM template giving you that feeling of cohesion.

Creating A Public IP address Using The Portal
When you create a new VM in the portal the default setting is to create a new dynamic public IP address along with the VM. You can change it to be static or use an existing public IP address if need be or you can choose None if you don’t want your VM to be directly accessible from the internet.

Nic

Note that even if you choose to have a public IP address for your VM it won’t have a DNS name, at the time of writing you can’t assign a DNS name when you create the VM in the portal, you have to do it  afterwards, instructions here.

Creating a public IP address using ARM templates

{
  "apiVersion": "2015-06-15",
  "type": "Microsoft.Network/publicIPAddresses",
  "name": "mynewpublicip",
  "location": "[resourceGroup().location]",
  "properties": {
  "publicIPAllocationMethod": "static", //or dynamic
    "dnsSettings": {
    "domainNameLabel": "testing8423"
    }
  }
}

The DNS settings are optional and will create a DNS entry with your label and the name of the Azure region for example: testing8423.westus.cloudapp.azure.com. On your NIC template you reference the public IP address.

...
 "name": "defaultNICName",
  "dependsOn": [
 "Microsoft.Network/publicIPAddresses/mynewpublicip",
 "Microsoft.Network/virtualNetworks/virtualNetworkName"],
 "properties": {
 "ipConfigurations": [
 {
  "name": "DefaultNicIpconfig",
  "properties": {
  "privateIPAllocationMethod": "Dynamic",
  "publicIPAddress": {
   "id":"[resourceId(Microsoft.Network/publicIPAddresses       /mynewpublicip)]"
 },...

Note: I removed some of the JSON elements for sake of readability.

Creating a public IP address using PowerShell
I didn’t try it myself since I’ve been using ARM Templates of late but it looks easy enough. You create a new public IP address with New-AzureRmPublicIpAddress and then you create a new NIC and assign the IP address to it using New-AzureRmNetworkInterface and the -PublicIpAddress or -PublicIpAddressID parameter.

New-AzureRmPublicIpAddress -Name IPName -AllocationMethod Static/Dynamic -ResourceGroupName ... 

New-AzureRmNetworkInterface-PublicIpAddress<PSPublicIpAddress> -ResourceGroupName... -IpConfiguration ... -Location ... -Name ...

White Listing Public IPs
When you create a new public IP address you get one from the block of IP addresses Microsoft owns, so you can’t choose a specific one. If you have a requirement to white list specific public IP addresses for the long term you’ll have to create the public static IP upfront and retrieve the allocated IP address.  You can assign the public IPs to NICs as required. You can white list a range of Azure IP addresses downloaded from here but that isn’t always practical.

Francois Delport

Azure Network Security Groups

This post is a summary and some links to documentation regarding Azure network security groups, it might useful if you are in need of a quick introduction to the subject.

Exposing a virtual machine to the internet
Before I get into network security groups I want to talk about the way Azure virtual machines are exposed to the internet using the Azure resource manager deployment method. By default when you create a new virtual machine using ARM in the new portal it will have a public IP address, the public IP address will be dynamic so it can change when the machine is restarted, you can make it static if need be for a monthly fee. The VM will not have a DNS name and you can’t specify one in the create VM wizard. You can add the DNS label after the machine is created or you can create the public IP separately with a DNS label and then point the new VM to use the existing public IP when you create it. The default network security group created with the VM will have a rule to allow RDP connections to this VM and some default rules used by Azure infrastructure. You can also use load balancers but that is a different story all together.

What Are Network Security Groups?
Short version (based on documentation link below): A network security group contains a list of rules that allow or deny traffic to a specified port or port range at a subnet or network interface card level. The rules also take into account the direction of the traffic, so it is not just for inbound traffic, you can also restrict outbound traffic. Applying the network security group at a subnet level will apply the rules to all the network cards in the subnet. Applying the network security group at network card level will only apply to that network card, if you have multiple network cards in a VM each one can have it’s own network security group. When you create your own rules take care not to block traffic to the 168.63.129.16 IP address and also port 1688, these are used by Azure internally for DHCP, DNS, Windows Licensing etc. Take note when using load balancers, your load balancer is backed by a pool of NICs, you should apply the network security group to the backend NIC pool to ensure all traffic passes through to the network security group, even traffic that didn’t pass though the load balancer.

Official documentation, very long but very informative read.

Practical Application Of Network Security Groups
Creating a DMZ is one of the important capabilities we get from network security groups, that said there are various options when creating a DMZ and it gets quite complicated. Options include using network security groups only, using vendor firewall devices and creating custom routes for traffic. I’ll briefly talk about the simplest option using only network security groups. At a very simplified level creating a DMZ for you application involves separating the physical layers of your application based on the traffic they will receive/send and restricting the traffic to the absolute minimum between the layers and the internet. In this example below the IIS front end and SQL back end are on different subnets and each subnet has its own network security group. All traffic from the internet and between subnets are interrogated by the network security groups against their rules. All traffic should be blocked by default and then you add rules to allow specific ports. In this example the allowed traffic are the orange lines for RDP to both subnets, HTTP traffic to the website and SQL traffic between the front end subnet and the back end subnet. There are no rules for the outgoing traffic in this example. Setting up outgoing rules can be a bit tricky since most application can respond on a range of addresses.

Azure Network Security Groups

The links to the official documentation and DMZ examples are below:

Build a Simple DMZ with NSGs

Build a DMZ to protect applications with a Firewall and NSGs

Build a DMZ to Protect Networks with a Firewall, UDR, and NSG

Francois Delport