Visual Studio Team Services Environments And Machines

In my previous post I showed a very simple example using Visual Studio Team Services Release Management albeit to the default environment. In this post I’m going to dive deeper into the concept of Visual Studio Team Services environments and machines.

Environments
When you think of the term environment in the context of deploying software the first thought is usually one or more servers where you deploy your application to. But in VSTS environments are something different and this is bit confusing in the beginning. In VSTS environments are a logical container for a set of variables, approvers, tasks and agent queues etc. I think the most important point is your set of deployment tasks are defined per environment. You have to put some thought into the design of your deployment process to balance the trade off between the re-use of assets and the ease of making changes per environment.

If I contrast the VSTS approach with Octopus Deploy where you have one deployment process, you could craft some control logic using variables, environments and life cycles but it could become very messy and difficult to follow. Changes to your deployment process would impact all the environments using that project making it more cumbersome when you have changes for instance to your dev environment only. This is often the case since you would introduce functionality incrementally per environment from dev to production.

In VSTS you can change the deployment tasks for one environment without affecting other environments but if you have the same change in all environments at once you have to repeat the change for each environment. From experience this should not happen very often since you do it incrementally from dev to production. It will be interesting to see how this plays out in the long run

Also keep in mind how you structure your deployment scripts, ideally you want to have the same script for all your environments but with different parameters passed in for different environments. If you have different logic for each environment it will become a maintenance burden and also leave you open to human error since you will be crafting a script for production that was never tested in dev or qa, missing the whole point of continuous deployment. You can’t  completely escape errors but making changes to production by adding new variables is less error prone than running a new script.

Where do I specify my servers
This leads to the obvious question, where do I specify which servers to deploy to if that is not in my environment. Some deployment tasks have a section for machines where you can provide a comma separated list of machine names or IP address, a variable that will contain the names or a machine group name.

Visual Studio Team Services Environments And Machines

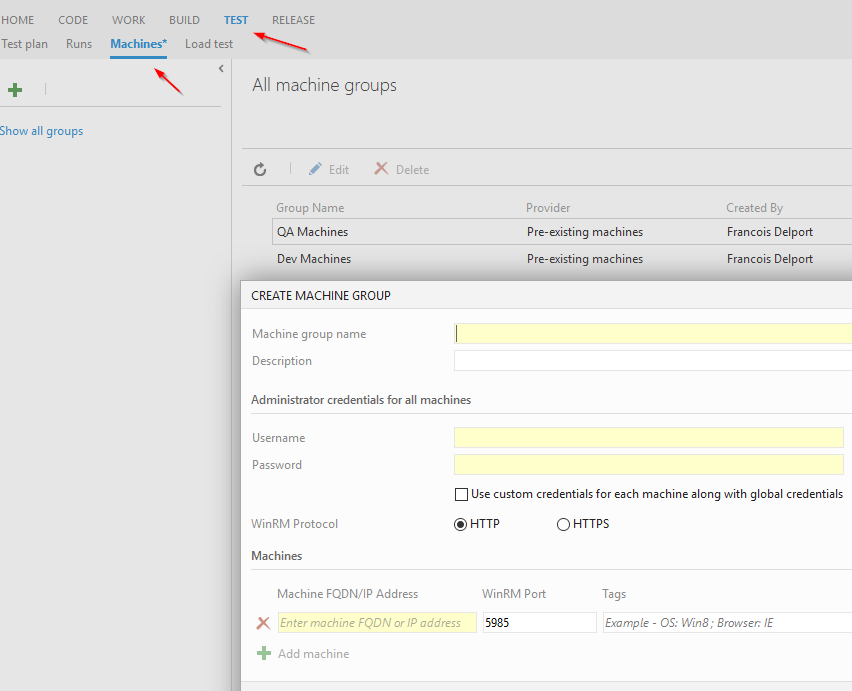
A machine group is a collection of machines, you could make one called Dev for instance and add all you development machines to it. To create machine groups open the Test menu in VSTS and then the Machines sub menu. The machines must have WinRM configured and accessible.

Visual Studio Team Services Environments And Machines

You can also use output variables from steps that create new VMs like the Azure Resource Group Deployment Task and pass those to subsequent steps. Some tasks like Command Line or Batch Script doesn’t have the ability to specify a machine name and they will execute on the server where the agent is hosted. If you really have to use these steps instead of remote PowerShell you can control the agents that are selected using agent queues that are configured at the environment level and agent capabilities that are configured at the agent level.

Links:
VSTS Deployment Guide

Francois Delport

Azure Backup

I have been using Azure Backup for a while now and I’m going to give a quick overview, especially around notifications which are not that easy to find. The official FAQ documentation is over here.

Azure Backup is able to backup entire Azure VMs, on-premise Windows Servers, SQL Server databases and files/folders. Some of the backups types like SQL and Hyper-V require Data Protection Mananger (DPM) which is part of System Centre or Azure Backup Server which is a stand alone product .The official getting started guide is  here but the short version is:

  • Create a backup vault that will contain your backups.
  • Create retention policies if you don’t want to use the default one.
  • For on-premise: Download the backup agent and credentials from the Azure portal, install the backup agent and configure the backup schedule.
  • For Azure VMs: Discover and register Azure VMs using the Azure Portal.

You can create fine grained retention policies to govern your data storage  ranging from 1 day to 99 years enabling you to replace tape archives for instance. The backups are compressed and incremental, even the full machine image backups will compare changes at the block level, you can get more details here. This saves space but takes a little longer to restore since your data is reconstructed using a chain of incremental backups but in my experience it wasn’t so slow that it became a problem.

It is important but also obvious that your first backup will be a full one. Depending on the size of the servers or files you are backing up you may want to do this on physical media and ship it to Microsoft instead of using your internet connection see details here. You can choose local redundant or geo redundant storage for your backup vaults when you create them, it can’t be changed once you registered items for backup.

One aspect of Azure Backup that I found difficult to use was notifications. I think most users would like to know when a backup failed via email and the obvious place to do this would be the backup section in the portal with an add alert button for instance but that is not the case. You can setup alerts using management services and Powershell, this method is not specifically for backups you can use it to receive alerts for any job failure. At the time of writing this only worked with VM backups not other types. You can find the details here. The short version is:

  • Retrieve the resource URI for your backup vault. One way is to use the management services section of the old azure portal, find your backup jobs and view the details of the job to get the resource URI.
  • Run the “Add-AlertRule” Powershell cmdlet to create a new notification for that resource URI. This will be at the vault level, not a specific backup job.

You can also roll your own by creating a script to retrieve backups jobs but at the time of writing this only worked for Azure VM backups not other types.

$vaults = Get-AzureRmBackupVault

foreach ($vault in $vaults)
{
    $jobs = Get-AzureRmBackupJob -Vault $vault -From $startdate 
            ` -To $enddate

    foreach($job in $jobs)
    {
        #your own code to do something
    }
}

Francois Delport

Release From Visual Studio Team Services To On-Premise Servers Using Web Deploy

In my previous post I showed how to host a private agent to build your solutions on-premise. Today I’m going to show how to release from Visual Studio Team Services to on-premise servers using Web Deploy and a private agent.

Just like the build experience the release management features got an overhaul in VSTS, the previous Release Management product is now rolled into VSTS and TFS Update 2. Most of the current functionality is focused on releasing to Azure but you can use PowerShell or the command line to execute your own install scripts.

For this demo I’m going to release a simple web application using a web deploy package. You could deploy to IIS using remote agent deployment straight from the VSTS servers to on-premise but that is not always possible or allowed in secure environments. When you build a web deploy package the build process will retrieve some settings from you local IIS instance to set some defaults for the package. This won’t work if you use a hosted agent, I’ll be using my private agent for building as well as releasing the web deploy package. In a future post I’ll dive into web deploy in more detail but for now I’ll be using the defaults for deployment since the post is about VSTS release management not web deploy.

Firstly you have to modify your build and pass in the arguments to instruct MSBuild to create the deployment package, as shown here:

Release From Visual Studio Team Services To On-Premise Servers Using Web Deploy

I’m only interested in the deployment package output from the build process so I’m going to publish the deployment package folder to my artifact output.

Release From Visual Studio Team Services To On-Premise Servers Using Web Deploy

In Visual Studio set your publish settings for the web deployment package, take note of the package location, it is the folder you specified in the artifact publish step and I’m creating it in the root of the solution folder to keep things easy. Check the change in and kick off a build.

Release From Visual Studio Team Services To On-Premise Servers Using Web Deploy

Back in VSTS open the release menu. To create a new release, click on the + sign to create a new release definition and start with a blank definition.

Release From Visual Studio Team Services To On-Premise Servers Using Web Deploy

This demo deployment will have only one step to execute the web deploy package with its default parameters. Click on Add tasks and choose Command Line from the Utility sub section. To get the correct path to the web deploy .cmd file you can browse the artifacts published in the build step. Remember to save the new release definition you created.

Release From Visual Studio Team Services To On-Premise Servers Using Web Deploy

I’ll cover the details of environments and different release types in a future post but for now this will be a manual release to the default environment. Access the context menu for the definition you created and select Release.

Release From Visual Studio Team Services To On-Premise Servers Using Web Deploy

On the next screen accept all the defaults except under artifacts select the latest build of your code and click Create. This will not launch the deployment yet since we are doing it manually. If you look at your list of releases you will see a new release definition. Double click this release and click on the Deploy menu item and deploy to the default environment.

Release From Visual Studio Team Services To On-Premise Servers Using Web Deploy

Once the deployment is completed, you will see the new web application in IIS using defaults picked up from your solution.

This was just one way of many to accomplish on-premise deployments, if you look at the example from MSDN, they are using WinRM and DSC to install IIS, WebDeploy and to install the web app.

Note: On the destination IIS server you also have to take some steps to set up IIS for deployment. You have to install Web Deploy and the easiest way seems to be Web Platform Installer. Also make sure the IIS Management Service feature is installed.

Release From Visual Studio Team Services To On-Premise Servers Using Web Deploy

Francois Delport

Visual Studio Team Services Private Build Agents

In this post I’m going to show you how to use Visual Studio Team Services private build agents. Visual Studio Team Services (VSTS) supports two types of build agents, hosted and private. Hosted agents run on Microsoft servers in the cloud and private agents are hosted by you. When you create your VSTS account you will see two agent pools, Hosted containing your default hosted agent and Default which will be empty. I’ll be adding my private build agent to the Default pool for this demo.

Visual Studio Team Services Private Build Agents

Hosted agents make it easy to get started and work great for building most applications but there are limitations since you have no control over the build server environment, hosted agents can also be used to deploy to Azure. If the VSTS build environment doesn’t meet the requirements for your application build you can host your own build agents in your own environment. These locally hosted agents can also be used to deploy your application locally.

To get started click on the Download agent link in your agent pools control panel, unzip the file and run ConfigureAgent.cmd. Fill in the prompts, they are pretty self explanatory but keep in mind depending on your application your build can get very big and I/O intensive, it could be worth it to put your working directory on a separate drive. If you get stuck the documentation is over here.

If the installation was successful you will see the newly installed agent in your pool.

Visual Studio Team Services Private Build Agents

Note: Initially I installed the agent to run as a service using the default local service account and it worked for most of my applications but I had one build that required running as a specific user account. As per the documentation I used the “C:\Agent\Agent\VsoAgent.exe /ChangeWindowsServiceAccount” command from an elevated command prompt to change the service account but that didn’t work. The service didn’t update with the new credential and the agent showed as off line in VSTS.

To fix the problem I had to run “C:\Agent\ConfigureAgent.cmd” again specifying the new account name and then it worked.

Next step is to configure certain builds to use my on-premise agent by default since the build won’t work using the hosted agent. The simplest but least dynamic way is the set the build to only use agents from a specific pool. In this example I set the build to use the Default pool.

Visual Studio Team Services Private Build Agents

You can for instance limit builds that take very long to a certain pool so they won’t prevent other applications from building. Depending on the complexity of your environment and projects it would be better to use demands and capabilities as well. On your agent there is a list of capabilities and you can add custom ones, in this case I called the capability OnPrem.

Visual Studio Team Services Private Build Agents

In my build definition I can now specify the agent to be used for building must meet this demand.

AgentDemand

Now it will choose an agent from the pool that satisfies the demand. If you create a rule that cannot be satisfied, you’ll get this error message to warn you or else your build would just be stuck.Visual Studio Team Services Private Build Agents

Free VSTS accounts include one free private agent and charge $15 per agent there after. Even if the hosted agent is able to build your application look into the private agents, depending on the machine hosting the agent, your build can be a lot faster.

Francois Delport

Using SSH Between FishEye And Your BitBucket Server

In this post I’m going to cover using SSH between FishEye and your BitBucket server. When you configure BitBucket Server you have the option to enable SSH and HTTPS connections. Although you can use BitBucket without SSH there are scenarios where it is better to use SSH, one of them is connecting BitBucket and FishEye.

If you use HTTPS only connections with FishEye you will experience the following problems.

  • You won’t see the repositories it discovered automatically in the BitBucket Repositories Tab. When you add an Application Link to BitBucket and enable SSH it will automatically scan the repositories and show them here. Technically you can live without this functionality and manually add the repositories using Native Repository access but that is more involved.Using SSH Between FishEye And Your BitBucket Server
  • If you add a repository link using HTTPS the user name and password is stored in plain text in the config.xml file of your FishEye instance. If you use SSH only the name of the key is stored.

Security
I was pleasantly surprised to find out an SSH server is already bundled with BitBucket, and if you have an existing SSH service already running, this one should not interfere with it. I was also weary to open up even more ports on our servers for security reasons but it looks like bundled SSH server is locked down pretty well, you can’t use it to execute arbitrary SSH commands and it is not open to existing users on the system. You can read more here in the official documentation.

Keys
Generating the keys are done automatically if you have the application link between FishEye and BitBucket configured. When you see the repository in the BitBucket Server repositories list, click on the Add button. The repository will now show Added next to its name and it will also appear in the Native repository access list.  You can confirm this by clicking on the repository name in FishEye and in BitBucket by clicking on the cog icon in the repository.

Using SSH Between FishEye And Your BitBucket Server
FishEye
Using SSH Between FishEye And Your BitBucket Server
BitBucket


NOTE: Make sure you choose the correct option when you install GIT on your FishEye server and confirm that you can run ssh.exe and git.exe from the command prompt. If it doesn’t work check your PATH variable and try restarting the FishEye service to pick up the changed PATH. You can specify the path to git.exe in FishEye but not ssh.exe, it must be able to get to it from the PATH.

Using SSH Between FishEye And Your BitBucket Server

If this isn’t configured properly you will receive errors in FishEye that it can’t find the ssh executable.

Francois Delport